
Using Oscommerce Admin
Filenames | Front Page | Image Names | Category Images | Templates
Most of the information below is specific to 2.2 RC2A. Notes on 2.3 and later are usually marked.
This page is by no means a complete guide, and there are many aspects of Oscommerce which are not covered here. These are mostly tips and tricks to get you started. For more detailed information, you could start with this excellent set of articles.
Your admin address is usually http://yourdomain.com/catalog/admin
Category Notes
Category Names – do not use reserved or illegal characters. Instead of “Bits/Pieces” or “Bits & Pieces” use “Bits and Pieces or “Bits – Pieces”. (more under filenames below)
Subcategories
If you have subcategories, move all parts from parent category into subcategory, then category listings will show in body of parent category page. (depending on particular Oscommerce installation, that is)
See also Oscommerce Product Manager
Add New Product
The procedure may vary slightly according to the particular Oscommerce installation.
Once inside the Admin/Catalog section, click on a yellow folder to enter that category
(clicking the category title will allow you to edit the category information – please don’t unless you know what you’re doing). Click on “new product” button at bottom of page.
Product Status: default
Date Available: default
Product Manufacturer: select, or none
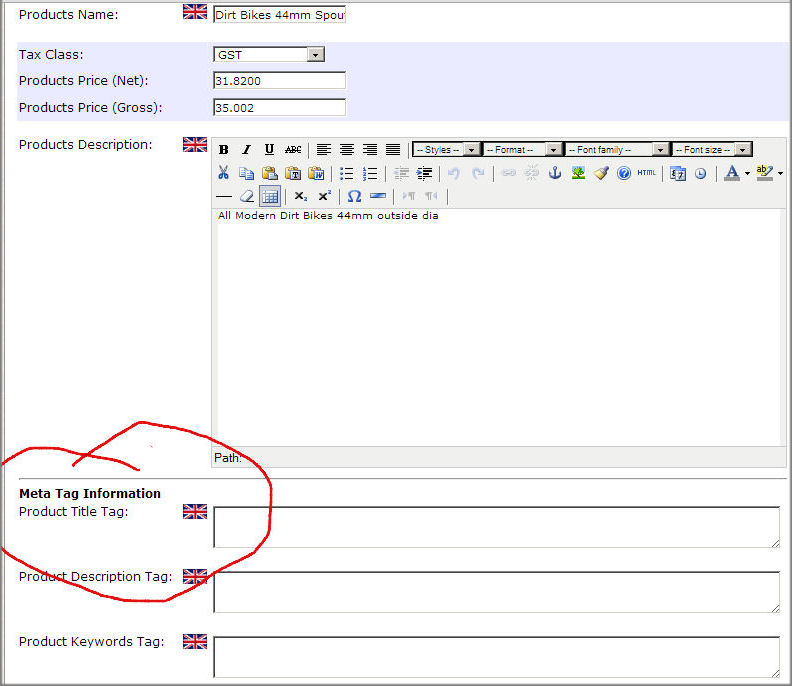
Products Name: Enter concise but descriptive name, spaces ok – this is the one which appears (usually alphabetically) in the catalog listing.
Tax Class: select (usually 10% GST or similar)
Products Price: enter gross price and net price will adjust accordingly. There may be several associated fields below this – usually you can just enter the gross price and the rest will autofill.
Products Description: HTML or plain text.
You will need to know some basic HTML unless the HTMLarea mod is installed. Use <br> to denote a line break.
(Be cautious about copying directly from MS Word as you may end up with very weird code – it is better to copy to a plain text editor like Notepad and then from there into the textbox – that said, however, copying direct can be a huge timesaver and the results are often quite presentable.)
Meta Tag Information
Below “Products Description” are three extra fields – these are the key to getting the pages to the top of the search engines. To speed up the process of adding products, you can copy and paste the key elements from the Products Description field above into the following three fields, and then come back later to clean up the results.
Product Page Title: – IMPORTANT
Enter the name of the product as close as you can to what you think people will search on.
If your product is Blue Widgets, and that’s what people are looking for, then that’s the title. If on the other hand they are more likely to be looking for say “Bottles of Blue Widgets”, then that’s the page title (assuming your widgets are actually blue and do come in bottles – truth in advertising, hey!)
Page Header Description: If you’re in a hurry, just copy and paste the title info into this field. Otherwise, expand on the title,
ie, “Excellent quality blueish green widgets from Hobbitland, absolutely gremlin-free.”
Product Keywords: Not terribly important. Leave blank, or copy and paste from the field above, or if you’re keen build a set of keywords and apply them to each product.
Products Qty: greater than zero or you can’t sell it.
Products Model: REQUIRED in most installations. Skip this field at your peril.
If you have a part number for the item, use that. If not, make one up, ie WIBU250 (for blue widgets 250ml)
Image Subdirectory: (Not all installations have this mod.)
Enter the name of the directory below your catalog/images directory. If the directory name is mysite.com/catalog/images/widgets just enter “widgets/”. If you want to create a new image directory “widgets/”, tick the New? box.
Why this mod? Because managing the images will be a nightmare if all 31 thousand of them are in the same directory.
Note: do not tick the “new” box if it’s not a new image directory or the program will have conniptions.
FAQ
How do I find the List of Image Subdirectories?
Using an FTP program, navigate to
public_html/catalog/images to see the list of subdirectories. Any that have further subdirs named “thumbnails” are the ones you want.
Subdirectory Tip: always use lower case, alphanumeric only, one word if possible, and NO SPACES. (Same goes for filenames)
Products Image. Browse your hard drive for the appropriate image. Keep it to a reasonable size. Thumbnails will be created on the fly in most installations.
Products URL: Link to external file. Leave this blank. In RC2A versions, it does not function as intended and redirects to the wrong page.
Product Weight: REQUIRED – if you don’t know the weight, just enter 1 – if no weight is listed, some freight modules spit the dummy.
STS Template Filename: You can obtain a list of available templates by FTP into the appropriate directory (usually /catalog/includes/sts_templates/… ).
Try to keep your images under 100kb or 1000×800 pixels. My personal preference is for a max image size of around 920 x 680px.
Click Preview
If all goes well, you should get a green line at the top of the page saying “Success: …” and the basic information you entered along with a thumbnail of the image will be presented.
Click the “insert” button.
Open the shop in a new window by right clicking “Online Catalog” at the top of the page. Use the search box to find your new entry. That’s it.
Tips. If you make an error that you see after you see preview but before the page is fully saved, don’t use the back button. Save the page and then start the edit process again. It’s not a bug, it’s a feature.
Updating product quantity in OsCommerce
In admin, go to Catalog, click the yellow folder button.
Note that the first item in the list shows the current stock level lower right, directly under price.
Select category, click the edit button. Halfway down the page is “Products Quantity”. Modify this as necessary, then click the preview button lower right.
Click update. You’re done. Go to next category.
Updating Product Information
In admin, go to Catalog, click the yellow folder button to the section in which the product resides, or use the searchbox.
Select product you wish to edit and click it, then click the edit button. Go to the “Products Description” section and modify this as necessary (you may use HTML extensively and even add images and links), then click the preview button lower right.
Click update. You’re done.
Delete or Deactivate a Product
Find the product as above.
You can now either deactivate the product so that it cannot be seen or found by users, or delete it completely. Once deleted, that’s it, it’s gone forever.
To deactivate, click the status button – it will change from green to red.
To delete, click the delete button. If there is more than one instance of the part, untag any you wish to keep.
Move a Product
Search on the product title (not the part number) in the admin section.
Click on the first match (if more than one), then use the pulldown menu top rhs (Go To:) to ascertain which directory you are in. Assuming that the part does not apply to this directory, move it. Click the Move button. Use the bottom dropdown menu to select the new category, and then click move. (Note that if there is more than one instance of the part it shows those, in which case it is better to copy the part to the category you want it in, then delete the surplus instance.)
Product Options
First you must create the set of Product Options you require – color & size may already exist.
Then add Option Values for your new Product Options.
Then add the Products Attributes to the product.
Procedure
Go to Admin> Catalog> Product_Attributes
Add a Product Option (ie size, color)
If you require another option other than size & color, add it in the box beneath “Option Name” and click insert. If you did not select from the dropdown menu, it will use the default which is text.
Add Option Values
Select which option you require, ie size, color, new_option, type the new option in the box (for size=16,20,or XXXXL; color= blue, puce/pink or camouflage) and click insert.
Add Product Attributes
Catalog > Product Attributes > Select a product from the dropdown list at the bottom, under Product Name. Select an option name and value. Click insert.
Select the same product again, and repeat until you have the full range of options for that product.
If you have a number of products which will require basically the same Product Attributes, for instance a range of T-Shirts, try this method: create one product with the appropriate options, then duplicate the product, rather than going through the whole procedure for each item.
Update: Some later versions work slightly differently. Best to create a template, load it for the product and then remove any sizes/colours etc you don’t need. There is a glitch in the current version which prevents sorting product options, so if for instance you wish to sort T-Shirts S,M,L,XL… you can’t.
Duplicate a Product
To duplicate a product, in Categories / Products select the product then in the right menu click “copy to”, on the next screen select the category you wish it to go to under “Categories:” and then under “Copy Method” select the “Duplicate Product” radio button. Click copy. The next screen will show you the duplicated product in the selected category. Edit the new product, ensure you give it a new and unique Product Model, and after saving and uploading make it active by turning the red dot green.
Copy a Product
Similar to Duplicate a Product, above.
It is a fairly simple matter to duplicate an existing product so it applies to several different models. Product A fits models 1, 2 & 3. You have three listings , A-1, A-2, and A-3, each is actually the same part with the same part number, sell any one and the stock decreases by one, change the price on one and the price changes on the other two also.
Changing Products Image
First enter the directory you wish to save the new image in – usually the same directory as the previous image.
In catalog/admin/categories/products/, select the product, click the browse button, find the new image on your hard drive, then click the preview button. The new image should show up on the following page. Click update.
Changing the shop’s Front Page
Text
If you have Mindsparx Admin, you can edit the text from the Info Manager tab.
Otherwise, go to catalog/includes/languages/english/index.php and edit the page directly, or go to Admin/Catalog/Define Mainpage (if relevant module installed)
Changing the Front Page – Main Image
Find the header image for the page which may be in a directory like catalog/images/ – edit and upload to site. If the site uses templating, find the relevant template and edit that. One can also edit catalog/index.php directly.
Changing or adding templates
If your system uses STS Templates you will find the templates in /catalog/includes/sts_templates/ (or similar). You can edit the templates much as you would a conventional html page, but read up on the templating system before you fiddle too much with them. If you call a template which doesn’t exist, the system will use the default template.Category Images
Use small category images. The program will resize images if you give it large ones, but it still has to load the image before it resizes. So if the category image is 200k, and you need only 4k, you’ve just wasted 196k of bandwidth, per customer, per category. That can really add up.
Category image size is set in configuration. Don’t change it unless necessary.
Use generic category images where possible to save creating a great many of them, and keep them in a local directory on your computer for ready reference.
There may be a small bug in the directory edit section which means that every time you edit the tags, you have to upload the image again.
Category Names
Your category names are going to show up in a breadcrumb trail like
Ducati >> Engine Parts >> Piston Rings
This is much more user friendly than
Motorbike Parts >> Engine related >> Bits that go up, down and bang
and much better for the search engines, so give some thought to the way you structure your categories.
Specials (if installed)
Admin > Catalog > Specials.
Dropdown lists all products alphabetically along with current price. Choose product, enter Special Price, add expiry date (use blue arrow to pick date from calendar popup). Date format DD MM YYYY
More notes on the Specials setup page.
Special prices will show up in list view and product page. Oscommerce Cross-Sell (xsell)
This brings to the customers’ attention products or services complementary to the item they are currently viewing.
In admin, Catalog > Cross Sell Products. After completing edit, exit X-Sell and re-enter module in order to edit a second product.
Regular Jobs
Backup database in admin/tools. It’s a good idea to keep a recent local backup as well as online copies.
Update currency – go to localizations, click on update currencies button.
Several things to note on image names:
1. Name all jpg images imagename.jpg – not imagename.JPG
2. Beware llegal filenames – they can cause havoc.
3. Use descriptive filenames whenever possible.
Illegal filenames
—————–
If you upload a file with a name like “Low\’s.jpg”, the backslash was probably inserted by whichever program you used to upload the file. The server objects to that file, and it won’t display. So, only numbers, letters and spaces in filenames (and hyphens and fullstops).
Examples of illegal filenames:
Low\’s.jpg
don’t.jpg
not/’legal.jpg
As a rule of thumb, make your filenames all lower case, with no spaces or any other characters except hypen or underscore.
Typically: filename.jpg file_name.jpg or filename_121.jpg
If you stick to that, you’ll have no problems at all.
The same goes for category names.
Descriptive filenames
———————
Suppose you’ve named your image “BM MS F65 GS 04.jpg”
Some programs take the title of the page from the image filename. The title is generally what the search engines believe the page is primarily about, so anyone searching for BM MS F65 GS 04 will find it straight away. Of course, if the page is actually about Blue Widgets, then a better name for the image would be blue_widgets.jpg.
As a rule of thumb, name the image what you expect the people to be searching on. It also helps when you’re searching for a particular image if you’re using a formula – Brand Model Type Year etc. Your image directories are going to grow considerably over the years, so sticking to the formula will make management easier.
Remember: NO SPACES, and ALPHANUMERIC Only (plus _ – and .) (and I avoid hyphens too)
How to search for a part from admin.
The search function from admin works differently to that in the user section.
Open the user section of the catalog in a new window, then search on the part number, the item title or some part of the description. Then return to admin and search on the description that the part has in the online catalog.
Best to practise this on a dummy item first, and try to get a feel for how the system is working. It works extremely well, but it has its foibles. The search function is one of them as the user search and admin search give different results.
Oscommerce Product Manager
This program overcomes many of the limitations of the standard Oscommerce admin interface. It’s a standalone program which runs on your local computer and allows manipulation of many aspects of the Oscommerce database. It is not a replacement for the Oscommerce admin, but when used in unison becomes a very useful tool.
Storing images locally
It is good practice to have a directory structure on your local computer which resembles the structure of the website.
So a typical directory (folder) for your catalog images would be c:/ internet/(mydomain)/catalog/images/(subfolder)
Quirks & Errors (errata)
Categories with subcategories not showing subcategory images and links. Move all products from the parent category in question to a subcategory. The Category must have no products in it to display subcats.